It's an ADSL wireless router with linux-based software inside, licensed under GPL.
The price is reasonable, Amazon sells it for $60. I got mine from local store for about $80. The only drawback with WRT is it's not compatible with ADSL service offered by the only ISP in this country, Etisalat. But you know what? It means your chance to bargain the price is even better!
The most interesting feature from WRT is you can replace the software with third party firmware. Hey, it means we void the warranty! This is acceptable in the world where the only way to find the truth is by hacking. Suck the knowledge by testing and trying. Fill the brain with the answers of uncertainty.
Anyway, today we are going to make Linksys WRT54G as wireless IDS. This ADSL router will become the sensor or drone for famous wireless tool Kismet. As per its website, Kismet is an 802.11 layer2 wireless network detector, sniffer, and intrusion detection system. Kismet identifies networks by passively collecting packets and detecting standard named networks, detecting (and given time, decloaking) hidden networks, and infering the presence of nonbeaconing networks via data traffic.
There are several people that already have mentioned how we can run Kismet on WRT. From Rasmus’ Toys Page, RenderLab, Kismet forum, to Netstumbler discussion forum.
Just remember the following:
- WRT54G is only the drone, the sensor that collects wireless information. We need another computer or notebook running kismet server. Please don't run Micro$oft Window$ even it's possible, and we need to have SSH/SCP client as well
- When running kismet in WRT, we can’t use it as wireless access point at the same time
- All kismet files that we copy to WRT are kept temporarily in /tmp directory, and it will be flushed every time we reboot the device
- By doing this hack, there is a chance to ruin the router, screw the software and turn the device into blue colored brick, nice dual-antenna decoration for your living room … hmm, it’s worth $60, isn’t it?
Now, let's our adventure begins!
1. Read this blog until you understand what you are going to do.
2. If you are new to kismet, try to install it in your notebook and play around a bit to get familiar with the interface and configuration file.
3. Get the third party firmware. I’m using Sveasoft Satori-4.0 version firmware, so if you guys want to follow my steps, download it from Linksysinfo site. You must register but it’s free anyway. Btw, this is the last free version available from Sveasoft. To get the new version (alchemy) you need to donate $20 to them. But hey, $20 is nothing for cool firmware they produce. Unfortunately I can't subscribe since UAE is not in paypal country list.
4. Connect to WRT with your browser. Default IP address is 192.168.1.1, so type http://192.168.1.1 in your browser and put “admin” in password when prompted. You may change the IP address or your password as you wish. My WRT is using 10.1.1.10 IP address.
5. Replace linksys original software by going to Administration, Firmware Upgrade. Click browse and find the firmware, then push upgrade. If you are a religious man, start praying. Hopefully everything fine and you can complete the upgrade.
6. The router will reboot automatically and when it comes back you should see Satori-4.0 in Firmware Version.
7. Now go to Administration, Management and enable SSH.
8. We need to put our public key in Authorized Keys column. Assuming you are using Linux or *BSD with OpenSSH client in your notebook, generate the public-private key pairs:
[root@immortal ~]# ssh-keygen –t rsa
9. Grab the content of your public key from .ssh/id_rsa.pub file, and paste it in WRT's Authorized Keys.
10. Now you can SSH from your notebook to the router without putting any password.
11. Download the pre-compiled kismet drone binary from here. It’s bz2 file so you can decompress it using bz2 –d option, then untar the file by using tar –xvf option to get kismet folder.
12. Kismet folder contains /etc and /bin folder. We need to edit kismet_drone.conf file. In my case, for example, I modified the network in allowed host from default 192.168.0.0/16 to 10.0.0.0/8 network. Kismet server can connect to the drone from anywhere, as long as it still in “allowed host” scope. Btw, if you don’t know the meaning of /16 or /8, RTFM!
I assume my WRT54G is v2, since I don’t need to modify the source in kismet drone configuration file: source=wrt54g,eth1,wrt54g
13. Now we can upload the whole kismet folder to our WRT using scp:
[root@immortal ~]#scp –r kismet root@10.1.1.10:/tmp/kismet
Don’t forget to change the IP address according to your router address.
14. SSH to your WRT, and run the kismet drone:
(none):[~]# /tmp/kismet/bin/kismet_drone
Suid priv-dropping disabled. This may not be secure.
No specific sources given to be enabled, all will be enabled.
Enabling channel hopping.
Disabling channel splitting.
Source 0 (wrt54g): Enabling monitor mode for wrt54g source interface eth1 channel 6...
Source 0 (wrt54g): Opening wrt54g source interface eth1...
Kismet Drone 2004.04.devel_nikki_2004.05.23 (Kismet)
Listening on port 3501 (protocol 8).
Allowing connections from 10.0.0.0/255.0.0.0
WARNING: Setting driver in STA mode to enable channel hopping
Yes, it’s on, baby! Kismet drone is running and ready to accept the connection from kismet server on port 3501.
15. You need to run kismet server in your notebook. If you haven’t installed it, do so by compiling from source or type “emerge kismet” for Gentoo users.
We have to modify the kismet configuration file, /etc/kismet.conf by default, to use kismet drone as source:
source=kismet_drone,10.1.1.10:3501,drone
If you like kismet server to drop the privilege to normal user, put the username in suiduser configuration: suiduser=himawan
16. Change your working directory to any directory where the user that you specified in suiduser can write the kismet log files, then start kismet as root:
[root@immortal tmp]# kismet
If everything’s ok, you should get the kismet panel interface just like below:
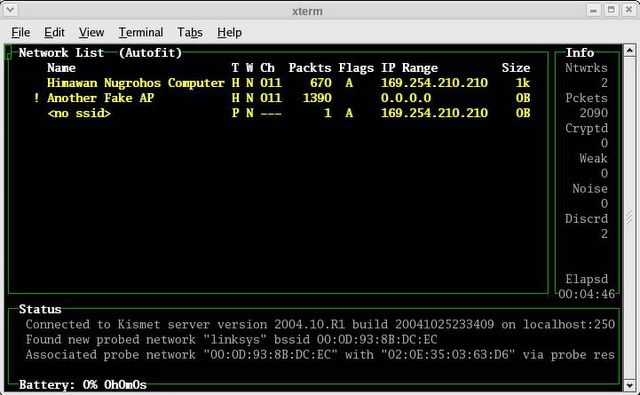
Well, it’s not difficult, isn’t it?
Just remember, every time you reboot WRT, you have to upload the kismet directory again using SCP.
Now what?
To make WRT54G running as real IDS, we have to analyze the log files in kismet server. Kismet will dump the wireless traffic its captured to Kismet-date.dump file. Then we can read the file using tcpdump –r option or ethereal. Or maybe test the traffic against snort rules?
I’ll check this later on. Now what I have in my mind is to use this router to do …
WARDRIVING!
2 comments:
Very cool article. Any progress on analyzing traffic from the dump files?
You can read the contents of the kismet dump files easily with Wireshark (formerly ethereal).
Post a Comment