Saturday, February 26, 2005
Friday, February 25, 2005
WRT54G Story Continues
Yesterday I bought another WRT54G from local store. After heavy bargaining and bluffing, I got it for $78. Now that I have 2 WRTs, I can put one at home for normal AP and one inside my car for “anything else”. Nice plan, huh?
From the outside box, there is no different between the new WRT and the one that I purchased couple of months ago. But after I removed it out from the box and read the version number on the back, it’s written “WRT54G v2.2”. My first WRT is v2.0.
I checked the box again and there is nothing at all that can give me a clue about the version of the device inside. Only I notice WRT54G v2.2 has serial number started from CDF7xxx while v2.0 has serial number CDF5xxx. But I’m not 100% sure.
Anyway, from our best friend Google I found out that there are currently 4 versions of WRT54G in the market:
v1.0, v1.1, v2.0 and v2.2.
Read the nice presentation from Neal Dudley here. It contains the pictures of all versions of WRT54G from external and internal view.
According to Simon in Linksysinfo forum, until now only the latest HyperWRT firmware and official firmware from Linksys can be used to flash v2.2. From somewhere I read that v2.2 actually uses the same Broadcom chipset, but now the LAN ports controller is part of the chipset.
Quick check from cpuinfo output confirms that both 2.0 and 2.2 versions are using the same chipset:
(none):[~]# cat /proc/cpuinfo
system type : Broadcom BCM947XX
processor : 0
cpu model : BCM3302 V0.7
BogoMIPS : 199.47
So now I’m stuck with WRT54G v2.2 and I can’t use my favorite Sveasoft Satori to flash the router. Should I use the new WRT as normal AP and the previous 2.0 as my mobile scanner? Well, I don’t like to spend 78 bucks only to get normal AP, so I downloaded the latest HyperWRT firmware and upgraded my new router.
Everything looks good. Now I have the option to increase the transmit power to 84 mW and I like the idea to put “reboot” button on the web interface. However, SSH is not available by default, only telnet. The good thing about HyperWRT is it has an option to modify the startup script. I put telnet command and “route add default gw 10.1.1.1” in startup script to make sure both will be available even I reboot the router. I don’t understand why there is no option to put default gateway for LAN interface on the web interface, even though I can achieve the same thing by putting the mentioned route command in startup script.
How about Kismet? Well, since there is no SSH, I have to run wget to get the kismet drone binary and config files. It consumes more effort since now I have to setup a web server with all the files. Sure it’s a linux system, honey. So I should be able to install any packages, right? The problem is the file system of HyperWRT is mounted as read only. We can write new files in /tmp directory only. And as you may guest, all these new files will go away once we reboot the router.
So I decide to try with “unofficial” Sveasoft Alchemy firmware which can be downloaded from freeWRT site. Hey listen, I don’t mind to pay $20 annually but I can’t pay with Paypal. I have sent Sveasoft support an email and requested to let me pay through other way.
The reason why I love Sveasoft software is because they build feature-rich firmware. I’m using Alchemy 6 Mod v16 and I can see there is an option to mount SMB file system. I haven’t tried to mount any drives yet but I believe it rocks!!!
How about the performance? I see that I can boost the power to 251 mW. Hmm, doesn’t it sound so tendentious?
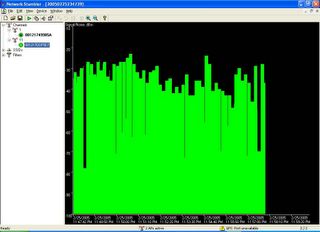
So I run netstumbler to verify. I put one Linksys in Channel 1 and the other in Channel 11. WRT54G v2.0 running Satori is on channel 1 with 28 mW Xmit power and the result can be seen below:

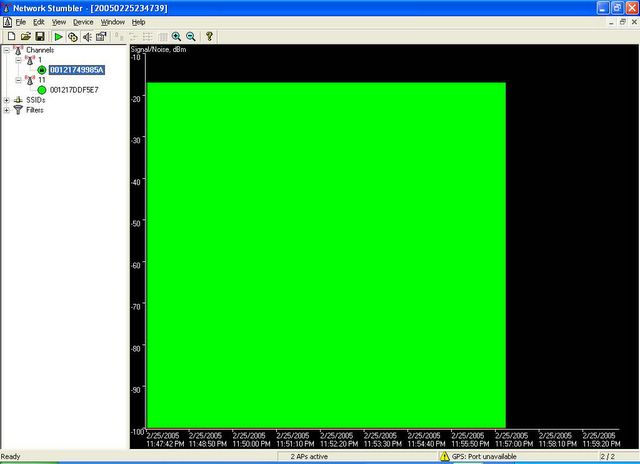
As we can see, the performance is constant in one point. Then I compare with WRT54G v2.2 running Alchemy on channel 11 with maximum 251 mW:
Well, the picture has spoken. The performance of Alchemy is not as stable as Satori. And even when I use WRT v2.2 Alchemy as normal AP, my laptop got disconnected several times.
I need to run more test to double check. But I believe I have already made my mind: Satori will stay at home and Alchemy will get the honour to be in my car. Unless it’s proven that I can’t use Alchemy to even run stable Kismet off course.
Is it true that we can use only HyperWRT and Sveasoft Alchemy for WRT54G v2.2? Some people say even you don’t turn the router into blue colored brick, there is a chance to lose the LAN ports if the firmware we use is not compatible with the new LAN controller chipset. Then you can re-flash the firmware only from the wireless network.
I would like to try it by myself, but not tonight.
OpenBSD Layer 2 bridging firewall has been waiting.
If you like to read the e-mail from Sveasoft to Google regarding the copyright violation by FreeWRT site, please check out this link. For me, I prefer to subscribe and get the firmware officially.
The decision is yours.
From the outside box, there is no different between the new WRT and the one that I purchased couple of months ago. But after I removed it out from the box and read the version number on the back, it’s written “WRT54G v2.2”. My first WRT is v2.0.
I checked the box again and there is nothing at all that can give me a clue about the version of the device inside. Only I notice WRT54G v2.2 has serial number started from CDF7xxx while v2.0 has serial number CDF5xxx. But I’m not 100% sure.
Anyway, from our best friend Google I found out that there are currently 4 versions of WRT54G in the market:
v1.0, v1.1, v2.0 and v2.2.
Read the nice presentation from Neal Dudley here. It contains the pictures of all versions of WRT54G from external and internal view.
According to Simon in Linksysinfo forum, until now only the latest HyperWRT firmware and official firmware from Linksys can be used to flash v2.2. From somewhere I read that v2.2 actually uses the same Broadcom chipset, but now the LAN ports controller is part of the chipset.
Quick check from cpuinfo output confirms that both 2.0 and 2.2 versions are using the same chipset:
(none):[~]# cat /proc/cpuinfo
system type : Broadcom BCM947XX
processor : 0
cpu model : BCM3302 V0.7
BogoMIPS : 199.47
So now I’m stuck with WRT54G v2.2 and I can’t use my favorite Sveasoft Satori to flash the router. Should I use the new WRT as normal AP and the previous 2.0 as my mobile scanner? Well, I don’t like to spend 78 bucks only to get normal AP, so I downloaded the latest HyperWRT firmware and upgraded my new router.
Everything looks good. Now I have the option to increase the transmit power to 84 mW and I like the idea to put “reboot” button on the web interface. However, SSH is not available by default, only telnet. The good thing about HyperWRT is it has an option to modify the startup script. I put telnet command and “route add default gw 10.1.1.1” in startup script to make sure both will be available even I reboot the router. I don’t understand why there is no option to put default gateway for LAN interface on the web interface, even though I can achieve the same thing by putting the mentioned route command in startup script.
How about Kismet? Well, since there is no SSH, I have to run wget to get the kismet drone binary and config files. It consumes more effort since now I have to setup a web server with all the files. Sure it’s a linux system, honey. So I should be able to install any packages, right? The problem is the file system of HyperWRT is mounted as read only. We can write new files in /tmp directory only. And as you may guest, all these new files will go away once we reboot the router.
So I decide to try with “unofficial” Sveasoft Alchemy firmware which can be downloaded from freeWRT site. Hey listen, I don’t mind to pay $20 annually but I can’t pay with Paypal. I have sent Sveasoft support an email and requested to let me pay through other way.
The reason why I love Sveasoft software is because they build feature-rich firmware. I’m using Alchemy 6 Mod v16 and I can see there is an option to mount SMB file system. I haven’t tried to mount any drives yet but I believe it rocks!!!
How about the performance? I see that I can boost the power to 251 mW. Hmm, doesn’t it sound so tendentious?
So I run netstumbler to verify. I put one Linksys in Channel 1 and the other in Channel 11. WRT54G v2.0 running Satori is on channel 1 with 28 mW Xmit power and the result can be seen below:
As we can see, the performance is constant in one point. Then I compare with WRT54G v2.2 running Alchemy on channel 11 with maximum 251 mW:

Well, the picture has spoken. The performance of Alchemy is not as stable as Satori. And even when I use WRT v2.2 Alchemy as normal AP, my laptop got disconnected several times.
I need to run more test to double check. But I believe I have already made my mind: Satori will stay at home and Alchemy will get the honour to be in my car. Unless it’s proven that I can’t use Alchemy to even run stable Kismet off course.
Is it true that we can use only HyperWRT and Sveasoft Alchemy for WRT54G v2.2? Some people say even you don’t turn the router into blue colored brick, there is a chance to lose the LAN ports if the firmware we use is not compatible with the new LAN controller chipset. Then you can re-flash the firmware only from the wireless network.
I would like to try it by myself, but not tonight.
OpenBSD Layer 2 bridging firewall has been waiting.
If you like to read the e-mail from Sveasoft to Google regarding the copyright violation by FreeWRT site, please check out this link. For me, I prefer to subscribe and get the firmware officially.
The decision is yours.
Wednesday, February 23, 2005
Kismet on WRT54G the Easiest Way
Linksys WRT54G is awesome.
It's an ADSL wireless router with linux-based software inside, licensed under GPL.
The price is reasonable, Amazon sells it for $60. I got mine from local store for about $80. The only drawback with WRT is it's not compatible with ADSL service offered by the only ISP in this country, Etisalat. But you know what? It means your chance to bargain the price is even better!
The most interesting feature from WRT is you can replace the software with third party firmware. Hey, it means we void the warranty! This is acceptable in the world where the only way to find the truth is by hacking. Suck the knowledge by testing and trying. Fill the brain with the answers of uncertainty.
Anyway, today we are going to make Linksys WRT54G as wireless IDS. This ADSL router will become the sensor or drone for famous wireless tool Kismet. As per its website, Kismet is an 802.11 layer2 wireless network detector, sniffer, and intrusion detection system. Kismet identifies networks by passively collecting packets and detecting standard named networks, detecting (and given time, decloaking) hidden networks, and infering the presence of nonbeaconing networks via data traffic.
There are several people that already have mentioned how we can run Kismet on WRT. From Rasmus’ Toys Page, RenderLab, Kismet forum, to Netstumbler discussion forum.
Just remember the following:
- WRT54G is only the drone, the sensor that collects wireless information. We need another computer or notebook running kismet server. Please don't run Micro$oft Window$ even it's possible, and we need to have SSH/SCP client as well
- When running kismet in WRT, we can’t use it as wireless access point at the same time
- All kismet files that we copy to WRT are kept temporarily in /tmp directory, and it will be flushed every time we reboot the device
- By doing this hack, there is a chance to ruin the router, screw the software and turn the device into blue colored brick, nice dual-antenna decoration for your living room … hmm, it’s worth $60, isn’t it?
Now, let's our adventure begins!
1. Read this blog until you understand what you are going to do.
2. If you are new to kismet, try to install it in your notebook and play around a bit to get familiar with the interface and configuration file.
3. Get the third party firmware. I’m using Sveasoft Satori-4.0 version firmware, so if you guys want to follow my steps, download it from Linksysinfo site. You must register but it’s free anyway. Btw, this is the last free version available from Sveasoft. To get the new version (alchemy) you need to donate $20 to them. But hey, $20 is nothing for cool firmware they produce. Unfortunately I can't subscribe since UAE is not in paypal country list.
4. Connect to WRT with your browser. Default IP address is 192.168.1.1, so type http://192.168.1.1 in your browser and put “admin” in password when prompted. You may change the IP address or your password as you wish. My WRT is using 10.1.1.10 IP address.
5. Replace linksys original software by going to Administration, Firmware Upgrade. Click browse and find the firmware, then push upgrade. If you are a religious man, start praying. Hopefully everything fine and you can complete the upgrade.
6. The router will reboot automatically and when it comes back you should see Satori-4.0 in Firmware Version.
7. Now go to Administration, Management and enable SSH.
8. We need to put our public key in Authorized Keys column. Assuming you are using Linux or *BSD with OpenSSH client in your notebook, generate the public-private key pairs:
[root@immortal ~]# ssh-keygen –t rsa
9. Grab the content of your public key from .ssh/id_rsa.pub file, and paste it in WRT's Authorized Keys.
10. Now you can SSH from your notebook to the router without putting any password.
11. Download the pre-compiled kismet drone binary from here. It’s bz2 file so you can decompress it using bz2 –d option, then untar the file by using tar –xvf option to get kismet folder.
12. Kismet folder contains /etc and /bin folder. We need to edit kismet_drone.conf file. In my case, for example, I modified the network in allowed host from default 192.168.0.0/16 to 10.0.0.0/8 network. Kismet server can connect to the drone from anywhere, as long as it still in “allowed host” scope. Btw, if you don’t know the meaning of /16 or /8, RTFM!
I assume my WRT54G is v2, since I don’t need to modify the source in kismet drone configuration file: source=wrt54g,eth1,wrt54g
13. Now we can upload the whole kismet folder to our WRT using scp:
[root@immortal ~]#scp –r kismet root@10.1.1.10:/tmp/kismet
Don’t forget to change the IP address according to your router address.
14. SSH to your WRT, and run the kismet drone:
(none):[~]# /tmp/kismet/bin/kismet_drone
Suid priv-dropping disabled. This may not be secure.
No specific sources given to be enabled, all will be enabled.
Enabling channel hopping.
Disabling channel splitting.
Source 0 (wrt54g): Enabling monitor mode for wrt54g source interface eth1 channel 6...
Source 0 (wrt54g): Opening wrt54g source interface eth1...
Kismet Drone 2004.04.devel_nikki_2004.05.23 (Kismet)
Listening on port 3501 (protocol 8).
Allowing connections from 10.0.0.0/255.0.0.0
WARNING: Setting driver in STA mode to enable channel hopping
Yes, it’s on, baby! Kismet drone is running and ready to accept the connection from kismet server on port 3501.
15. You need to run kismet server in your notebook. If you haven’t installed it, do so by compiling from source or type “emerge kismet” for Gentoo users.
We have to modify the kismet configuration file, /etc/kismet.conf by default, to use kismet drone as source:
source=kismet_drone,10.1.1.10:3501,drone
If you like kismet server to drop the privilege to normal user, put the username in suiduser configuration: suiduser=himawan
16. Change your working directory to any directory where the user that you specified in suiduser can write the kismet log files, then start kismet as root:
[root@immortal tmp]# kismet
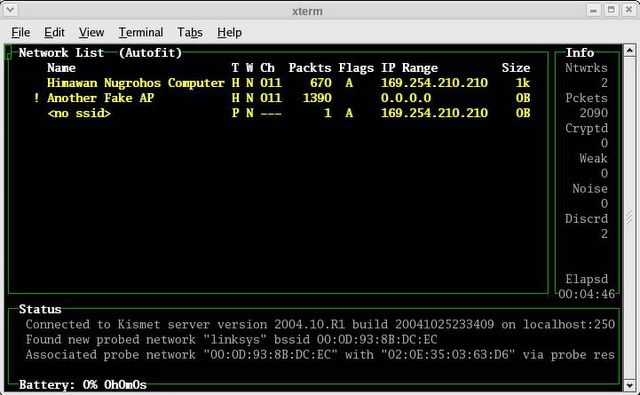
If everything’s ok, you should get the kismet panel interface just like below:
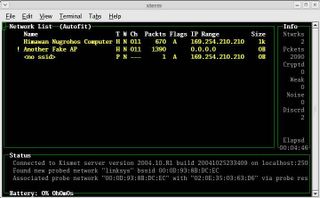
Well, it’s not difficult, isn’t it?
Just remember, every time you reboot WRT, you have to upload the kismet directory again using SCP.
Now what?
To make WRT54G running as real IDS, we have to analyze the log files in kismet server. Kismet will dump the wireless traffic its captured to Kismet-date.dump file. Then we can read the file using tcpdump –r option or ethereal. Or maybe test the traffic against snort rules?
I’ll check this later on. Now what I have in my mind is to use this router to do …
WARDRIVING!
It's an ADSL wireless router with linux-based software inside, licensed under GPL.
The price is reasonable, Amazon sells it for $60. I got mine from local store for about $80. The only drawback with WRT is it's not compatible with ADSL service offered by the only ISP in this country, Etisalat. But you know what? It means your chance to bargain the price is even better!
The most interesting feature from WRT is you can replace the software with third party firmware. Hey, it means we void the warranty! This is acceptable in the world where the only way to find the truth is by hacking. Suck the knowledge by testing and trying. Fill the brain with the answers of uncertainty.
Anyway, today we are going to make Linksys WRT54G as wireless IDS. This ADSL router will become the sensor or drone for famous wireless tool Kismet. As per its website, Kismet is an 802.11 layer2 wireless network detector, sniffer, and intrusion detection system. Kismet identifies networks by passively collecting packets and detecting standard named networks, detecting (and given time, decloaking) hidden networks, and infering the presence of nonbeaconing networks via data traffic.
There are several people that already have mentioned how we can run Kismet on WRT. From Rasmus’ Toys Page, RenderLab, Kismet forum, to Netstumbler discussion forum.
Just remember the following:
- WRT54G is only the drone, the sensor that collects wireless information. We need another computer or notebook running kismet server. Please don't run Micro$oft Window$ even it's possible, and we need to have SSH/SCP client as well
- When running kismet in WRT, we can’t use it as wireless access point at the same time
- All kismet files that we copy to WRT are kept temporarily in /tmp directory, and it will be flushed every time we reboot the device
- By doing this hack, there is a chance to ruin the router, screw the software and turn the device into blue colored brick, nice dual-antenna decoration for your living room … hmm, it’s worth $60, isn’t it?
Now, let's our adventure begins!
1. Read this blog until you understand what you are going to do.
2. If you are new to kismet, try to install it in your notebook and play around a bit to get familiar with the interface and configuration file.
3. Get the third party firmware. I’m using Sveasoft Satori-4.0 version firmware, so if you guys want to follow my steps, download it from Linksysinfo site. You must register but it’s free anyway. Btw, this is the last free version available from Sveasoft. To get the new version (alchemy) you need to donate $20 to them. But hey, $20 is nothing for cool firmware they produce. Unfortunately I can't subscribe since UAE is not in paypal country list.
4. Connect to WRT with your browser. Default IP address is 192.168.1.1, so type http://192.168.1.1 in your browser and put “admin” in password when prompted. You may change the IP address or your password as you wish. My WRT is using 10.1.1.10 IP address.
5. Replace linksys original software by going to Administration, Firmware Upgrade. Click browse and find the firmware, then push upgrade. If you are a religious man, start praying. Hopefully everything fine and you can complete the upgrade.
6. The router will reboot automatically and when it comes back you should see Satori-4.0 in Firmware Version.
7. Now go to Administration, Management and enable SSH.
8. We need to put our public key in Authorized Keys column. Assuming you are using Linux or *BSD with OpenSSH client in your notebook, generate the public-private key pairs:
[root@immortal ~]# ssh-keygen –t rsa
9. Grab the content of your public key from .ssh/id_rsa.pub file, and paste it in WRT's Authorized Keys.
10. Now you can SSH from your notebook to the router without putting any password.
11. Download the pre-compiled kismet drone binary from here. It’s bz2 file so you can decompress it using bz2 –d option, then untar the file by using tar –xvf option to get kismet folder.
12. Kismet folder contains /etc and /bin folder. We need to edit kismet_drone.conf file. In my case, for example, I modified the network in allowed host from default 192.168.0.0/16 to 10.0.0.0/8 network. Kismet server can connect to the drone from anywhere, as long as it still in “allowed host” scope. Btw, if you don’t know the meaning of /16 or /8, RTFM!
I assume my WRT54G is v2, since I don’t need to modify the source in kismet drone configuration file: source=wrt54g,eth1,wrt54g
13. Now we can upload the whole kismet folder to our WRT using scp:
[root@immortal ~]#scp –r kismet root@10.1.1.10:/tmp/kismet
Don’t forget to change the IP address according to your router address.
14. SSH to your WRT, and run the kismet drone:
(none):[~]# /tmp/kismet/bin/kismet_drone
Suid priv-dropping disabled. This may not be secure.
No specific sources given to be enabled, all will be enabled.
Enabling channel hopping.
Disabling channel splitting.
Source 0 (wrt54g): Enabling monitor mode for wrt54g source interface eth1 channel 6...
Source 0 (wrt54g): Opening wrt54g source interface eth1...
Kismet Drone 2004.04.devel_nikki_2004.05.23 (Kismet)
Listening on port 3501 (protocol 8).
Allowing connections from 10.0.0.0/255.0.0.0
WARNING: Setting driver in STA mode to enable channel hopping
Yes, it’s on, baby! Kismet drone is running and ready to accept the connection from kismet server on port 3501.
15. You need to run kismet server in your notebook. If you haven’t installed it, do so by compiling from source or type “emerge kismet” for Gentoo users.
We have to modify the kismet configuration file, /etc/kismet.conf by default, to use kismet drone as source:
source=kismet_drone,10.1.1.10:3501,drone
If you like kismet server to drop the privilege to normal user, put the username in suiduser configuration: suiduser=himawan
16. Change your working directory to any directory where the user that you specified in suiduser can write the kismet log files, then start kismet as root:
[root@immortal tmp]# kismet
If everything’s ok, you should get the kismet panel interface just like below:
Well, it’s not difficult, isn’t it?
Just remember, every time you reboot WRT, you have to upload the kismet directory again using SCP.
Now what?
To make WRT54G running as real IDS, we have to analyze the log files in kismet server. Kismet will dump the wireless traffic its captured to Kismet-date.dump file. Then we can read the file using tcpdump –r option or ethereal. Or maybe test the traffic against snort rules?
I’ll check this later on. Now what I have in my mind is to use this router to do …
WARDRIVING!
Friday, February 18, 2005
Sunday, February 13, 2005
eBay is Bliss
Isn't it?
Perhaps, if you live in US.
I have been using eBay for couple of years.
I bought things from notebook, wireless card, PDA, sun workstation, and even baseball shirt.
If you look at the price, it's very easy to get temped to buy.
To bid. To snip the bid. Watch all the suckers lose the auction only in the last minute.
But the problem for me is: I live in middle east.
I bought an item for $10 and the seller asked $35 for the shipping cost.
One shirt for only $25 but $60 for delivery charge.
The other day, one seller sent me the wrong item.
Or even broken item. (maybe it was broken when the seller shipped it?)
And yeah right, they said I can get refund by filling the form from my post office. But first I had to take the picture, downloaded the insurance form, filled the complaint. Sent everything to the seller, and got replied that there would be another form I had to download from USPS office and filled.
And then? No more news. No more reply from the seller.
So should I still use eBay to buy something?
You bet, I will. I can live with the risk.
That's what make the effort worth even more.
Hello power sellers, I'm looking for Sony Aibo ERS-7 !
Thursday, February 10, 2005
PIX Firewall-ing (Part 3)
To allow people from the Internet to connect to the servers located inside our internal network, we need to do 3 steps:
1. Create a static translation between one public IP address to the real IP address of our servers
2. Create an access control list to allow access to the server public IP address
3. Apply the access list on the interface
Suppose we have a web server with real IP address 192.168.1.5. This server will be translated to public IP address 1.1.1.5.
First, we have to create static translation with static command:
pixfirewall(config)#static (inside,outside) 1.1.1.5 192.168.1.5
The format of the command is: static (higher security interface,lower security interface) public_IP_address internal_IP_address
To verify the translation is correct we can use 'show xlate' command:
pixfirewall(config)#show xlate
Global 1.1.1.5 Local 192.168.1.5
Now we need to create access control list. Access control list is a rule set for any traffic allowed or not allowed to particular destination. PIX uses 'default deny' concept, it means it you don't permit it explicitly in the rule set, the traffic will be denied.
The format is: access-list name_of_the_ruleset permit/deny protocol source destination eq ports. Protocol can be TCP, UDP, ICMP or even IP protocol such as ESP etc. If we don't specify any ports, it means we allow any ports for that protocol.
In this case, we want to allow access to our web server from anywhere on the Internet with destination port is port 80 or HTTP.
pixfirewall(config)#access-list externalrule permit tcp any host 192.168.1.5 eq 80
Remember, the destination IP address is the public IP of the web server, and not the real IP. Suppose we have 1 network 192.168.1.0/24 full of web servers (what kind of network is that?) and we want to allow anyone to connect to those all servers using HTTP:
pixfirewall(config)#access-list externalrule permit tcp any 192.168.1.0 255.255.255.0 eq 80
To apply the access-list on the interface, type the following:
pixfirewall(config)#access-group externalrule in interface outside
Until PIX OS 6.2, the access list can have only one direction, “in” means traffic flowing into interface outside from Internet. Consider yourself as firewall, you have one interface called outside, and any traffic coming to you from that interface will be inspected using access list named externalrule.
Ok, so now Internal network can go to the Internet and people from the Internet can connect to our web server using HTTP protocol.
What's next?
Let's put the name for the firewall:
pixfirewall(config)#hostname kungfuzen
kungfuzen(config)#
We need to put the password to connect to PIX remotely and enable the password to switch from user mode to privilege mode:
kungfuzen(config)#passwd password_for_telnet_or_ssh
kungfuzen(config)#enable password password_to_switch_to_priv_mode
PIX can be managed remotely by telnet or SSH from trusted interface. PIX can be managed only by SSH from outside interface. To enable SSH, we need to specify the domain name and generate key first:
kungfuzen(config)#domain-name pixsucks.com
kungfuzen(config)#ca generate rsa key 2048
For >= 1024, key generation could
take up to several minutes. Please wait.
Where 2048 is the key modules size. Save the key with following command:
kungfuzen(config)#ca save all
Then specify from where you can connect to PIX
kungfuzen(config)#ssh 0.0.0.0 0.0.0.0 inside
kungfuzen(config)#ssh 1.1.1.1 255.255.255.255 outside
PIX uses SSH version 1 and user name 'pix' so to connect from SSH client in *nix from inside, use this command:
[user@unix ~]$ ssh -l pix -c DES 192.168.1.1
pix@192.168.1.1's password:
Use the password as what we set with 'passwd' command. You will get the user mode prompt. Switch to privilege mode by typing 'enable' and put the password as what we specify using 'enable password'.
I think this will be the end of my PIX Firewall tutorial. There are so many features left in PIX that you can explore by yourself: application inspection using fixup, HTTP authentication, VPN, IDS feature, turbo access list. flood guard, failover etc. This link will take you to Cisco documentation for Cisco PIX 6.3.
Come on, you guys are grown-up, so I don't think I need to explain all Cisco PIX commands here. Just RTFM and use '?” anytime you are in doubt. Cisco website and google are your friends. Try all 'show' commands to check the status or the configuration.
In case this firewall doesn't belong to you, just erase the configuration completely by typing:
kungfuzen#write erase
Reboot the PIX, and.. voila! Back to factory default.
Now, put firewall back inside the box, wrap it, sell it in eBay or deliver the box to the real owner. As you wish. Good day.
1. Create a static translation between one public IP address to the real IP address of our servers
2. Create an access control list to allow access to the server public IP address
3. Apply the access list on the interface
Suppose we have a web server with real IP address 192.168.1.5. This server will be translated to public IP address 1.1.1.5.
First, we have to create static translation with static command:
pixfirewall(config)#static (inside,outside) 1.1.1.5 192.168.1.5
The format of the command is: static (higher security interface,lower security interface) public_IP_address internal_IP_address
To verify the translation is correct we can use 'show xlate' command:
pixfirewall(config)#show xlate
Global 1.1.1.5 Local 192.168.1.5
Now we need to create access control list. Access control list is a rule set for any traffic allowed or not allowed to particular destination. PIX uses 'default deny' concept, it means it you don't permit it explicitly in the rule set, the traffic will be denied.
The format is: access-list name_of_the_ruleset permit/deny protocol source destination eq ports. Protocol can be TCP, UDP, ICMP or even IP protocol such as ESP etc. If we don't specify any ports, it means we allow any ports for that protocol.
In this case, we want to allow access to our web server from anywhere on the Internet with destination port is port 80 or HTTP.
pixfirewall(config)#access-list externalrule permit tcp any host 192.168.1.5 eq 80
Remember, the destination IP address is the public IP of the web server, and not the real IP. Suppose we have 1 network 192.168.1.0/24 full of web servers (what kind of network is that?) and we want to allow anyone to connect to those all servers using HTTP:
pixfirewall(config)#access-list externalrule permit tcp any 192.168.1.0 255.255.255.0 eq 80
To apply the access-list on the interface, type the following:
pixfirewall(config)#access-group externalrule in interface outside
Until PIX OS 6.2, the access list can have only one direction, “in” means traffic flowing into interface outside from Internet. Consider yourself as firewall, you have one interface called outside, and any traffic coming to you from that interface will be inspected using access list named externalrule.
Ok, so now Internal network can go to the Internet and people from the Internet can connect to our web server using HTTP protocol.
What's next?
Let's put the name for the firewall:
pixfirewall(config)#hostname kungfuzen
kungfuzen(config)#
We need to put the password to connect to PIX remotely and enable the password to switch from user mode to privilege mode:
kungfuzen(config)#passwd password_for_telnet_or_ssh
kungfuzen(config)#enable password password_to_switch_to_priv_mode
PIX can be managed remotely by telnet or SSH from trusted interface. PIX can be managed only by SSH from outside interface. To enable SSH, we need to specify the domain name and generate key first:
kungfuzen(config)#domain-name pixsucks.com
kungfuzen(config)#ca generate rsa key 2048
For
take up to several minutes. Please wait.
Where 2048 is the key modules size. Save the key with following command:
kungfuzen(config)#ca save all
Then specify from where you can connect to PIX
kungfuzen(config)#ssh 0.0.0.0 0.0.0.0 inside
kungfuzen(config)#ssh 1.1.1.1 255.255.255.255 outside
PIX uses SSH version 1 and user name 'pix' so to connect from SSH client in *nix from inside, use this command:
[user@unix ~]$ ssh -l pix -c DES 192.168.1.1
pix@192.168.1.1's password:
Use the password as what we set with 'passwd' command. You will get the user mode prompt. Switch to privilege mode by typing 'enable' and put the password as what we specify using 'enable password'.
I think this will be the end of my PIX Firewall tutorial. There are so many features left in PIX that you can explore by yourself: application inspection using fixup, HTTP authentication, VPN, IDS feature, turbo access list. flood guard, failover etc. This link will take you to Cisco documentation for Cisco PIX 6.3.
Come on, you guys are grown-up, so I don't think I need to explain all Cisco PIX commands here. Just RTFM and use '?” anytime you are in doubt. Cisco website and google are your friends. Try all 'show' commands to check the status or the configuration.
In case this firewall doesn't belong to you, just erase the configuration completely by typing:
kungfuzen#write erase
Reboot the PIX, and.. voila! Back to factory default.
Now, put firewall back inside the box, wrap it, sell it in eBay or deliver the box to the real owner. As you wish. Good day.
I'm in love
Today I'm in love.
Not to any female students in the University where I spend most of my time (have I mentioned that one of my biggest customers is American University? And my company signed the contract with them to put me dedicatedly as a network and security consultant).
I'm not falling in love to any secretaries in my office either.
But to OpenBSD. I'm in love with OpenBSD.
It's funny since I have been with OpenBSD from version 3.2. But I have never been using it for something useful other than as firewall to protect my home lab or PC labs in my office. Curse me!
Have you ever seen the movie where two best friends fall in love after several years of their friendship? They didn't have the feeling before, until one incident happened and clicked their mind?
It happened to me too. Couple of days ago I re-arranged my book shelf and found the Absolute OpenBSD book from Michael Lucas. I started reading the book and some strange feeling came to me. My hand was shaking, my heartbeat became faster and faster, I could hardly breathe... The book is so good and made it really hard for me to stop reading. OpenBSD rocks! How come I have just realized that OpenBSD is so beautiful after being with it for almost 2 years?
Easy to install yet provide minimum and secure default packages, BSD airtool for wireless auditing, BSD ports mechanism, scrubbing and bandwidth management, and nice T-shirts for only $20!
So since yesterday, I started installing this OS in several PCs. One will be my next NTP server, one will be my Squid server, and one installation in Sun hardware for testing. And btw, finally I received my Acer TravelMate notebook that I gave to my company for repair. It took them almost 2 months to fix it. Well the problem was only with the charger but with free repair cost I should not complaint, should I?
Now I'm trying to install Gentoo and OpenBSD in that notebook. I have finished the BSD part, and now waiting for my Gentoo stage 1 installation to build my base system. The objective is clear: dual-boot notebook with wireless tools in both OS.
Gento... is just like my first wife. And OpenBSD, is just like another girl I have a crush with after having couple of years marriage.
Thanks to you, Michael.
Hey, this post should be about configuring Cisco PIX Firewall.
The part where I should explain how people can connect to internal servers from the Internet. Well, after completing 3 blogs, several installation of OpenBSD, and about 9 hours Lord of The Rings DVDs non-stop, looks like the next thing I need to do is to hit my bed.
Until our next meeting...
Wednesday, February 09, 2005
PIX Firewall-ing (Part 2)
Now to configure PIX we need to go to configuration mode. Type 'enable' from user mode prompt to get privilege mode prompt (#).
pixfirewall>enable
pixfirewall#
In privilege mode, we still can't modify the configuration but we can upgrade the software, reload, and run some debug for troubleshooting. Since this is a new firewall, there is no password to switch from user mode to privilege mode.
Now let's go to configuration mode, by typing 'configure terminal'
pixfirewall#conf t
pixfirewall(config)#
In PIX, you don't have to type the complete command. As long as the word we type is unique pointing to only one command, PIX will accept the command.
Firewall_name(config)# is global configuration mode prompt where normally in Cisco IOS we can configure only parameters that affect the device globally. For example, in Cisco router, in global mode we configure the name of the device. And to configure the IP address for one interface, you must go to that interface configuration mode and get the router(config-if)# prompt.
But this is not the case with PIX, global config mode is the only mode available to configure the firewall.
By default the interfaces are disable, so let's enable them:
pixfirewall(config)#interface ethernet0 auto
pixfirewall(config)#interface ethernet1 auto
Auto means the interface will negotiate the hardware speed automatically with the hub/switch where it's connected to.
Let's give the IP address to the interface, accordingly to the external network and internal network, using interface alias name:
pixfirewall(config)#ip address outside 1.1.1.2 255.255.255.0
pixfirewall(config)#ip address inside 192.168.1.1 255.255.255.0
All hosts in internal network need to use PIX inside interface IP address as default gateway. PIX itself needs to know its default gateway to send the traffic to external network or Internet, so let's specify the gateway (for example, Internet router ethernet IP address):
pixfirewall(config)#route outside 0.0.0.0 0.0.0.0 1.1.1.1
Now, unless we are freaks who have enough public IP for Internal network, I assume we use private IP so we need to NAT them to be able to go to the Internet.pixfirewall(config)#nat (inside) 1 0 0
pixfirewall(config)#global (outside) 1 1.1.1.3
How to read 'nat' command: any network behind interface inside (0 0 means 0.0.0.0 0.0.0.0) will be translated based on rule number '1' in any interfaces set with 'global'
How to read 'global' command: in interface outside, set translation rule number '1' so any network NAT-ed with this rule will be translated as 1.1.1.3 IP address.
We can also use PIX firewall outside interface IP address as translation IP.
pixfirewall(config)#global (outside) 1 interface
It means: inside network (in this case 192.168.1.0/24) will be translated to interface outside IP address (1.1.1.2) when they try to go to the Internet.
We can also use range of public IP address to translate internal network:
pixfirewall(config)#global (outside) 1 1.1.1.10-1.1.1.20
That's the only configuration you need to connect your internal network to the Internet. Just try to connect one PC on internal network, give IP address and default gateway accordingly, and this PC should be able to go to the Internet. Obviously you need to have Internet line and proper DNS setting but I won't discuss it because you are so lame if you don't know this!
With this minimal configuration, your internal network should be able to go to the Internet without any restriction and from the Internet no one should be able to connect to you.
Don't forget to save the configuration to make sure it will be available even if we reboot the firewall, by typing 'write memory' or 'wr m' for short:
pixfirewall#wr m
You can save the configuration from global mode or privilege mode, but not from user mode (> prompt). By the way, to go back to privilege mode from global mode just type 'exit'. To go back to user mode from privilege mode, type 'disable' since typing 'exit' from privilege mode will log you out from PIX.
As summary, 6 steps you need to do to be able to connect your internal network to the Internet and protected by PIX firewall:
1. Enable the interfaces
2. Give IP address for all interfaces
3. Put default route to outside network, pointing to Internet router ethernet interface for example
4. Put NAT in interface inside with translation rule number
5. Put Global in interface outside matching the translation rule number and the public IP address, can use PIX outside interface IP address or range public IP address
6. Save the configuration
How about if we want people from the Internet connect to our servers inside the Internal network?
(To be continued in part 3)
pixfirewall>enable
pixfirewall#
In privilege mode, we still can't modify the configuration but we can upgrade the software, reload, and run some debug for troubleshooting. Since this is a new firewall, there is no password to switch from user mode to privilege mode.
Now let's go to configuration mode, by typing 'configure terminal'
pixfirewall#conf t
pixfirewall(config)#
In PIX, you don't have to type the complete command. As long as the word we type is unique pointing to only one command, PIX will accept the command.
Firewall_name(config)# is global configuration mode prompt where normally in Cisco IOS we can configure only parameters that affect the device globally. For example, in Cisco router, in global mode we configure the name of the device. And to configure the IP address for one interface, you must go to that interface configuration mode and get the router(config-if)# prompt.
But this is not the case with PIX, global config mode is the only mode available to configure the firewall.
By default the interfaces are disable, so let's enable them:
pixfirewall(config)#interface ethernet0 auto
pixfirewall(config)#interface ethernet1 auto
Auto means the interface will negotiate the hardware speed automatically with the hub/switch where it's connected to.
Let's give the IP address to the interface, accordingly to the external network and internal network, using interface alias name:
pixfirewall(config)#ip address outside 1.1.1.2 255.255.255.0
pixfirewall(config)#ip address inside 192.168.1.1 255.255.255.0
All hosts in internal network need to use PIX inside interface IP address as default gateway. PIX itself needs to know its default gateway to send the traffic to external network or Internet, so let's specify the gateway (for example, Internet router ethernet IP address):
pixfirewall(config)#route outside 0.0.0.0 0.0.0.0 1.1.1.1
Now, unless we are freaks who have enough public IP for Internal network, I assume we use private IP so we need to NAT them to be able to go to the Internet.pixfirewall(config)#nat (inside) 1 0 0
pixfirewall(config)#global (outside) 1 1.1.1.3
How to read 'nat' command: any network behind interface inside (0 0 means 0.0.0.0 0.0.0.0) will be translated based on rule number '1' in any interfaces set with 'global'
How to read 'global' command: in interface outside, set translation rule number '1' so any network NAT-ed with this rule will be translated as 1.1.1.3 IP address.
We can also use PIX firewall outside interface IP address as translation IP.
pixfirewall(config)#global (outside) 1 interface
It means: inside network (in this case 192.168.1.0/24) will be translated to interface outside IP address (1.1.1.2) when they try to go to the Internet.
We can also use range of public IP address to translate internal network:
pixfirewall(config)#global (outside) 1 1.1.1.10-1.1.1.20
You know what?
That's the only configuration you need to connect your internal network to the Internet. Just try to connect one PC on internal network, give IP address and default gateway accordingly, and this PC should be able to go to the Internet. Obviously you need to have Internet line and proper DNS setting but I won't discuss it because you are so lame if you don't know this!
With this minimal configuration, your internal network should be able to go to the Internet without any restriction and from the Internet no one should be able to connect to you.
Don't forget to save the configuration to make sure it will be available even if we reboot the firewall, by typing 'write memory' or 'wr m' for short:
pixfirewall#wr m
You can save the configuration from global mode or privilege mode, but not from user mode (> prompt). By the way, to go back to privilege mode from global mode just type 'exit'. To go back to user mode from privilege mode, type 'disable' since typing 'exit' from privilege mode will log you out from PIX.
As summary, 6 steps you need to do to be able to connect your internal network to the Internet and protected by PIX firewall:
1. Enable the interfaces
2. Give IP address for all interfaces
3. Put default route to outside network, pointing to Internet router ethernet interface for example
4. Put NAT in interface inside with translation rule number
5. Put Global in interface outside matching the translation rule number and the public IP address, can use PIX outside interface IP address or range public IP address
6. Save the configuration
How about if we want people from the Internet connect to our servers inside the Internal network?
(To be continued in part 3)
PIX Firewall-ing (Part 1)
Cisco PIX Firewall is one of the best commercial firewall in the world. Pay attention to the word 'commercial'. I'm not comparing this expensive appliance with my love PF or even IP Tables, those two are free and powerful too! But like it or not, in the world where companies trust branded products and vendors, Cisco PIX really kicks in the firewall market.
Being an appliance means PIX has its own underlying operating system. And this is one of its advantage. Close-source is an evil, but for PIX it means no service running as default. And less people know about the PIX underlying OS means script kiddies with full of exploits for multi-purpose OS need to work hard to find specific exploit for PIX.
It doesn't mean PIX doesn't have any vulnerabilities. On November 2002, for example, Cisco announced the vulnerability in ISAKMP and HTTP authentication. Not running default services doesn't mean you don't want to enable them for your requirement, right?
Anyway, I'm not here to curse PIX. I'm a CCIE, remember? And I make money by selling Cisco products.
Today I'm going to explain how to make PIX firewall up and running in few minutes. But before we start, there are some concepts need to be noted:
PIX firewall is a stateful firewall, it means PIX tracks the TCP and UDP conversation. Different with PF where we have to put 'keep state' keyword, PIX does this automatically without additional configuration.
PIX distinguishes its interfaces by putting parameter called security levels.
For example, in PIX 506E with two interfaces, by default it has already put the alias name for those interfaces as 'outside' and 'inside'. As per their name, outside interface should be used to connect to outside the internal network (for example Internet), and inside interface should be connected to internal network we want to protect.
Interface outside has security level 0 (lowest trusted) and interface inside has security level 100 (highest trusted).
Traffic coming from the network connected to interface with higher security level can flow without any restrictions to the network connected to interface with lower security level. In contrary, traffic coming from the network connected to interface with lower security level, can't flow to the network connected to interface with higher security level, unless we permit it explicitly using Access Control List.
Using default configuration, internal network should be able to go to outside network or Internet, and traffic from outside network or Internet should not be able to go into the internal network unless we explicitly put the access control list.
If PIX has more than 2 interfaces, the other interfaces can have security level between 0 to 100, and the same rule implies.
Enough talking, let's configure one Cisco PIX506E. This is one of the cheapest Cisco PIX firewall available that can have only 2 interfaces maximum. You need to get Cisco PIX for sure. I'm not interested to hear from where you get it, just open it from the box and switch it on.
After we boot our brand new PIX, we'll end up with “(firewall_name)>” prompt. This is what Cisco called as user mode prompt. The command we can execute is limited, just type “?” to see available commands.
(By the way, I assume you guys a bit familiar with basic Cisco command and OS. To connect to brand new Cisco devices without configuration, you must use cisco console cable, roll-over cable with serial port in one end and RJ45 normal ethernet plug on the other end. So connect the serial port to your PC com port, and the RJ45 port to 'console' port in Cisco. Then use serial console terminal such as Hyper Terminal in Window$, or minicom, tip, zmodem etc in *nix. Just remember to set the speed to 9600.)
The first thing we need to do is checking the hardware capabilities using “show version” command.
pixfirewall>show version
From show version output, we can get following information:
- PIX OS Version number
- PIX Device Manager (Web based administration tool) version number
- System uptime
- Hardware information such as CPU and flash drive size... see, PIX 506 is only a crap Pentium II 300 Mhz and 32 Mb RAM. So much for a thousand bucks, huh?
- Number of interfaces and interfaces name
- Licensed feature such as failover, encryption for VPN (DES/3DES), how many maximum interfaces total we can have
- Serial number, needed to generate Activation key
- Running activation key
- Last modified configuration, when and by whom
Remember, PIX is commercial product that works on license, so if you don't see any feature you need (such as 3DES or failover), then you need to buy upgrade license and generate new activation key using the serial number of the firewall.
(To be continued in part 2)
Friday, February 04, 2005

Thursday, February 03, 2005
I'm not a coder
I'm not special
I'm ordinary
I'm mediocre
I can talk only baby perl
My scripting sucks
I don't speak C fluently
I'm not an expert
I'm not a coder
I'm ordinary
I'm mediocre
I can talk only baby perl
My scripting sucks
I don't speak C fluently
I'm not an expert
I'm not a coder
Subscribe to:
Posts (Atom)