Just got internal email regarding the new Cisco Certified Design Expert (CCDE) certification. From the email:
"The CCDE certification recognizes those with expert-level knowledge and skills in Infrastructure Design. CCDE is parallel to CCIE in terms of the expertise required and certification difficulty. It emphasizes network design principles and theory at the Infrastructure Layer and recognizes designers with the knowledge to assess network business requirements and translate them into technical specifications for successful designs."
Hmm, interesting. Especially for a Network Consulting Engineer who must breathe and live with network design everyday.
From the email that is released to public:
"What is a CCDE? The successful CCDE-certified individual must have a demonstrated an ability to analyze and develop solutions which address planning, design, integration, optimization, operations, security and on-going support focused at the infrastructure of large 1000+ node customer networks."
So.. is it 1000+ node for Enterprise or SP customers?
"Why Cisco Created the CCDE Program? Cisco created the CCDE program to respond to market demand in recognizing existing senior-level Network Designers and Architects while simultaneously providing senior Operations Engineers and Support Engineers with a validated professional development path into an Architectural role."
I'm just wondering how the lab test format will be. From the written test information, it seems like the topics covered are more into technologies on Service Provider or large Enterprise that provides network services for another companies (i.e. network resiliency, MPLS, TE, VPLS, L2TPv3, MPLS QoS etc and no common campus network features such as VLAN and switching, trunking, DHCP snooping, port security, etc). So will the lab exam similar as CCIE SP lab plus some design activities? Or just testing the knowledge in deploying common features that normally are deployed in any 1000+ nodes customer network? How to measure the design skill from each candidate?
I believe the real design skill is on the capability to capture all customer requirements correctly and to select the right features to answer each requirement accordingly. Knowing how to deploy the features is important, but knowing which features to deploy to address the requirements is far more important. So in the lab there might be story based scenarios to explain customer requirements and the candidate must figure out which features to answer and able to deploy the features successfully in order to build a complete network infrastructure. If required, there should be a presentation session in the end of the exam for the candidate to explain why he selects certain features to answer the requirements. Whatever format the lab will be, this new CCDE program is a breakthrough step from Cisco to accommodate market demand on Network Designers and Architects.
Let's just wait until Cisco releases the lab exam blueprint.
Wednesday, January 23, 2008
Sunday, January 20, 2008
Olive is Alive
I was bored and my Survival Mode level was high, so I started looking at my targets. The last 3 pictures in the right can be achieved easier if I can get the first 3 pictures in the left. Since the 1st target depends on the projects that my team are asked to deliver, so I moved to the 2nd one.
Many have asked me why I want to do another certification. And few even said I'm crazy to take certification from my company's competitor. My reply was "I need to refresh my skill and it's better to geeking out in the lab instead of doing nothing". Some may understand and some may not, but I don't want to get into a lengthy discussion and long debate. I simply want to do it. And I will do it.
I guess I have been influenced by Paul Arden: Whatever you think, think the opposite.
I know people may against this idea and call me a bit insane. And I won't get any support from my company. So far I have not found any workbooks available for this lab certification. I consider this journey will be more difficult than my CCIEs, but that's what make it more interesting. JNCIE will force me to re-learn SP technologies from different perspective not only from my company's. And for me JunOS CLI is just another interface to test and implement the concept, such as normal IOS CLI or XR.
My first step on this target is to prepare the emulation so I can practice JunOS. My research made me meet Olive, a name given to JunOS running on a PC.
Before I continue, let's go through some disclaimers:
Disclaimer 1: Olive doesn't exist.
Read the secrecy of Olive from this site.
Disclaimer 2: Whatever I'm doing with Olive has nothing to do with my work. Cisco never asked me to do a research about this emulator nor they ever asked me to do any integration testing between JunOS and IOS using emulator.
Disclaimer 3: Don't ask me to provide JunOS, or even Cisco IOS for dynamips (yes I received some requests through email). If you are really serious about doing this kind of stuff, you should have already known from where you can get all the resources.
Basically most information I put in here are available from these 2 sites: Juniper Clue and Internetwork Pro, with some addition from my own research, my Chinese friends and google to translate some Chinese websites.
So here are the steps to bring Olive to life. I'm doing it on Windows XP since that's the only OS in the laptop that I carry wherever I go, and the whole idea is to make it easier for me to practice the lab anytime, anywhere. I'm using Qemu and install FreeBSD on it, then I can install JunOS on that FreeBSD.
1. Download the latest version of Qemu for Windows.
Qemu website is in here. And Qemu for Windows can be downloaded from here. I'm using qemu 0.9.0. Simply unzip the file into a directory.
2. Download OpenVPN to create TAP interface.
TAP interface is a virtual interface that can be used by JunOS as fxp interface and allowing us to communicate from Windows OS to Olive over the virtual network. I'm using OpenVPN 2.0.9 for Windows. During the installation just select "TAP-Win32 Virtual Ethernet Adapter". We can create several tap interfaces with "Add a new TAP-Win32 virtual ethernet adapter" and rename them with something like 'Tap1', 'Tap2' and so on
3. Download FreeBSD 4.4 mini ISO
JunOS will be installed on top of FreeBSD.
4. Get JunOS. Mine is 8.3R2.8 version.
5. Download modified version of Qemu, Jqemu.
You have to subscribe to the forum in order to download this rar file (hint: use google to translate and locate the file first) and put it in the same folder with Qemu. Jqemu is Qemu version that can provide the driver for virtual intel nic type i82559er.
6. It's time to create the image for FreeBSD/Olive.
Run this command to allocate 3 Gig for the image:
C:\qemu>qemu-img.exe create olive.img -f qcow2 3G
Formating 'olive.img', fmt=qcow2, size=3145728 kB
7. Put the FreeBSD mini ISO in the same Qemu directory, and use this command to boot FreeBSD from the iso.
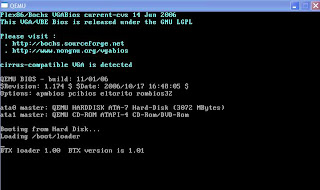
C:\qemu>qemu.exe -L . -m 256 -hda olive.img -cdrom 4.4-mini.iso -boot d -localtime
Qemu window will pop up:
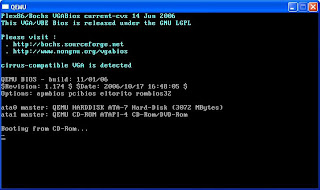
Let Qemu boot the FreeBSD installation image, and just follow the instruction on the menu to do standard installation:
- Skip Kernel configuration
- Choose standard installation
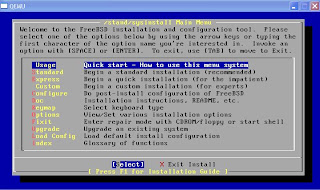
- With fdisk, press A to allocate entire disk for bsd
- Just select: install a standard MBR
- Create partition (with C):
512M for / partition
1024M for swap partition
128M for /config
and the rest for /var
- Choose installation type: user, and select No for FreeBSD ports
- X to Exit the menu and install from CD/DVD
- Wait until it's done
- select No No No No No on all the user confirmation requested (Ethernet/SLIP config, gateway, inetd, FTP, NFS, security, console, linux compatibility, set time, etc)
- X to exit the menu
- No for browse FreeBSD package collection and initial user account
- Type root password
- No for chance to set any last options
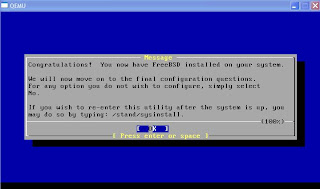
- Select 'X' to Exit the installation, it will reboot
- while it's rebooting, exit from Qemu by pressing Ctrl-Alt-2, then type: quit
8. Upload JunOS install package from Windows
Ok, FreeBSD has been installed in the Qemu and we are back to Windows again. Now we need to transfer JunOS file from windows to our BSD, so we need the BSD to have an interface that we can use to transfer the file using the network, for example with FTP.
Let's say we have created 1 Tap interface and rename it as Tap1. Right click this Tap1 interface on Windows Control Panel - Network Connections and give IP address for example 10.1.1.1/8
Start qemu using jqemu, with options to include i82559er as nic type, assigned mac-address and map the nic to interface name Tap1:
C:/qemu>jqemu.exe -L . -m 256 -hda Olive.img -localtime -net nic,vlan=1,macaddr=00:aa:00:00:01:01,model=i82559er -net tap,vlan=1,ifname=Tap1
We need to make sure we can have connectivity between the host Windows with Tap1 interface and the guess FreeBSD with fxp0 interface
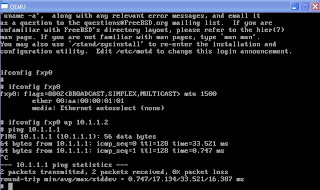
- login to the FreeBSD with the root account and password we set during the installation
- setup the IP address
#ifconfig fxp0 up 10.1.1.2
- try to ping 10.1.1.1 from FreeBSD
We can use FTP to copy jinstall file from Windows to BSD:
#cd /var/tmp
#ftp 10.1.1.1
Change type to binary and get the jinstall file.
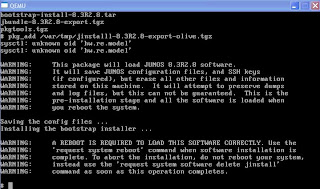
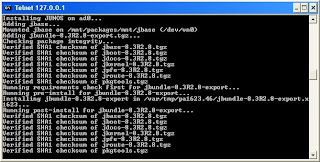
9. Modify jinstall file and install
JunOS image after 7.4 version has a binary called checkpic. This binary will fail and the image cannot be installed. Replacing this binary with /usr/bin/true fixes the issue.
We need to untar the signed jinstall file first:
#cd /var/tmp
#mkdir jinst-signed
#cd jinst-signed
#tar zxvf ../jinstall-8.3R2.8-export-signed.tgz
Then untar the unsigned image:
#mkdir jinst
#cd jinst
#tar zxvf ../jinstall-8.3R2.8-export.tgz
Extract the pkgtools.tgz file and replace the checkpic binary inside with /usr/bin/true :
#mkdir pkgtools
#cd pkgtools
#tar zxvf ../pkgtools.tgz
#cd bin
#cp /usr/bin/true ./checkpic
#cd ..
Create tar for pkgtools then remove the directory:
#tar zcvf ../pkgtools.tgz *
#cd ..
#rm -rf pkgtools
Create tar for the new jinstall package with modified checkpic
#tar zcfv /var/tmp/jinstall-8.3R2.8-export-olive.tgz *
Then install the new jinstall with bsd pkg_add tool:
#pkg_add /var/tmp/jinstall-8.3R2.8-export-olive.tgz
It will ask to reboot to continue the installation.
#reboot
When it's rebooting, press Ctrl-Alt-2 and type: quit.
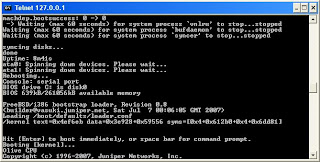
10. Login to Olive for the first time!
The default behavior from JunOS won't allow us to login to it from the standard output and we must use serial console instead. So start Qemu again using Jqemu.exe and this time put the option to redirect the output to serial port emulated by local TCP port 1001.
C:\qemu>jqemu.exe -L . -m 256 -hda Olive.img -serial telnet::1001,server -localtime -net nic,vlan=1,macaddr=00:aa:00:00:01:01,model=i82559er -net tap,vlan=1,ifname=Tap1
Qemu windows will pop up and it's waiting for TCP connection to port 1001.
Open another Windows DOS prompt and telnet 127.0.0.1 1001.
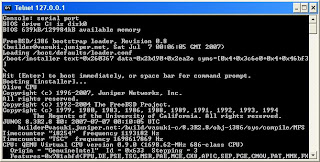
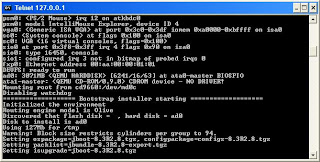
We can see the whole installation process until it reboots when it's done.
After JunOS installation is complete we can login to Olive for the first time with root account and no password.
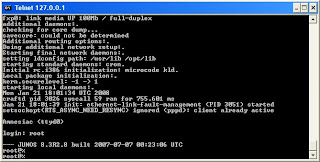
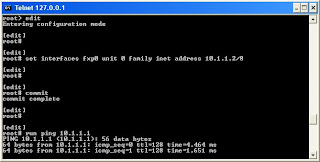
From BSD prompt, type 'cli' to go to JunOS prompt, then assign the IP address 10.1.1.2/8 to fxp0
root@%cli
root>edit
[edit]
root#
Create password for the root account, then set the IP address
[edit]
root#set system root-authentication plain-text-password
New password:
Retype new password:
[edit]
root#set interface fxp0 unit 0 family inet address 10.1.1.2/8
[edit]
root#commit
commit complete
If everything is set up properly, we should have connectivity from Olive from fxp0 interface to Windows Tap 1 interface.
Later we can install Kqemu to improve the performance:
- download kqemu from here, and extract it to a folder.
- Go to that folder, then the kqemu folder within it, and right click on kqemu.inf, and select install.
- from windows prompt type 'net start kqemu'
C:\>net start kqemu
The KQEMU virtualisation module for QEMU service was started successfully.
Now we can start Olive using Jqemu with additional kernel-kqemu option:
C:\qemu>jqemu.exe -L . -m 256 -hda Olive.img -serial telnet::1001,server -kernel-kqemu -localtime -net nic,vlan=1,macaddr=00:aa:00:00:01:01,model=i82559er -net tap,vlan=1,ifname=Tap1
So far I have shown that Olive is alive.
But please remember Disclaimer 1: it doesn't exist.
Many have asked me why I want to do another certification. And few even said I'm crazy to take certification from my company's competitor. My reply was "I need to refresh my skill and it's better to geeking out in the lab instead of doing nothing". Some may understand and some may not, but I don't want to get into a lengthy discussion and long debate. I simply want to do it. And I will do it.
I guess I have been influenced by Paul Arden: Whatever you think, think the opposite.
I know people may against this idea and call me a bit insane. And I won't get any support from my company. So far I have not found any workbooks available for this lab certification. I consider this journey will be more difficult than my CCIEs, but that's what make it more interesting. JNCIE will force me to re-learn SP technologies from different perspective not only from my company's. And for me JunOS CLI is just another interface to test and implement the concept, such as normal IOS CLI or XR.
My first step on this target is to prepare the emulation so I can practice JunOS. My research made me meet Olive, a name given to JunOS running on a PC.
Before I continue, let's go through some disclaimers:
Disclaimer 1: Olive doesn't exist.
Read the secrecy of Olive from this site.
Disclaimer 2: Whatever I'm doing with Olive has nothing to do with my work. Cisco never asked me to do a research about this emulator nor they ever asked me to do any integration testing between JunOS and IOS using emulator.
Disclaimer 3: Don't ask me to provide JunOS, or even Cisco IOS for dynamips (yes I received some requests through email). If you are really serious about doing this kind of stuff, you should have already known from where you can get all the resources.
Basically most information I put in here are available from these 2 sites: Juniper Clue and Internetwork Pro, with some addition from my own research, my Chinese friends and google to translate some Chinese websites.
So here are the steps to bring Olive to life. I'm doing it on Windows XP since that's the only OS in the laptop that I carry wherever I go, and the whole idea is to make it easier for me to practice the lab anytime, anywhere. I'm using Qemu and install FreeBSD on it, then I can install JunOS on that FreeBSD.
1. Download the latest version of Qemu for Windows.
Qemu website is in here. And Qemu for Windows can be downloaded from here. I'm using qemu 0.9.0. Simply unzip the file into a directory.
2. Download OpenVPN to create TAP interface.
TAP interface is a virtual interface that can be used by JunOS as fxp interface and allowing us to communicate from Windows OS to Olive over the virtual network. I'm using OpenVPN 2.0.9 for Windows. During the installation just select "TAP-Win32 Virtual Ethernet Adapter". We can create several tap interfaces with "Add a new TAP-Win32 virtual ethernet adapter" and rename them with something like 'Tap1', 'Tap2' and so on
3. Download FreeBSD 4.4 mini ISO
JunOS will be installed on top of FreeBSD.
4. Get JunOS. Mine is 8.3R2.8 version.
5. Download modified version of Qemu, Jqemu.
You have to subscribe to the forum in order to download this rar file (hint: use google to translate and locate the file first) and put it in the same folder with Qemu. Jqemu is Qemu version that can provide the driver for virtual intel nic type i82559er.
6. It's time to create the image for FreeBSD/Olive.
Run this command to allocate 3 Gig for the image:
C:\qemu>qemu-img.exe create olive.img -f qcow2 3G
Formating 'olive.img', fmt=qcow2, size=3145728 kB
7. Put the FreeBSD mini ISO in the same Qemu directory, and use this command to boot FreeBSD from the iso.
C:\qemu>qemu.exe -L . -m 256 -hda olive.img -cdrom 4.4-mini.iso -boot d -localtime
Qemu window will pop up:

Let Qemu boot the FreeBSD installation image, and just follow the instruction on the menu to do standard installation:
- Skip Kernel configuration
- Choose standard installation

- With fdisk, press A to allocate entire disk for bsd
- Just select: install a standard MBR
- Create partition (with C):
512M for / partition
1024M for swap partition
128M for /config
and the rest for /var
- Choose installation type: user, and select No for FreeBSD ports
- X to Exit the menu and install from CD/DVD
- Wait until it's done

- select No No No No No on all the user confirmation requested (Ethernet/SLIP config, gateway, inetd, FTP, NFS, security, console, linux compatibility, set time, etc)
- X to exit the menu
- No for browse FreeBSD package collection and initial user account
- Type root password
- No for chance to set any last options
- Select 'X' to Exit the installation, it will reboot
- while it's rebooting, exit from Qemu by pressing Ctrl-Alt-2, then type: quit
8. Upload JunOS install package from Windows
Ok, FreeBSD has been installed in the Qemu and we are back to Windows again. Now we need to transfer JunOS file from windows to our BSD, so we need the BSD to have an interface that we can use to transfer the file using the network, for example with FTP.
Let's say we have created 1 Tap interface and rename it as Tap1. Right click this Tap1 interface on Windows Control Panel - Network Connections and give IP address for example 10.1.1.1/8
Start qemu using jqemu, with options to include i82559er as nic type, assigned mac-address and map the nic to interface name Tap1:
C:/qemu>jqemu.exe -L . -m 256 -hda Olive.img -localtime -net nic,vlan=1,macaddr=00:aa:00:00:01:01,model=i82559er -net tap,vlan=1,ifname=Tap1
We need to make sure we can have connectivity between the host Windows with Tap1 interface and the guess FreeBSD with fxp0 interface
- login to the FreeBSD with the root account and password we set during the installation
- setup the IP address
#ifconfig fxp0 up 10.1.1.2
- try to ping 10.1.1.1 from FreeBSD

We can use FTP to copy jinstall file from Windows to BSD:
#cd /var/tmp
#ftp 10.1.1.1
Change type to binary and get the jinstall file.
9. Modify jinstall file and install
JunOS image after 7.4 version has a binary called checkpic. This binary will fail and the image cannot be installed. Replacing this binary with /usr/bin/true fixes the issue.
We need to untar the signed jinstall file first:
#cd /var/tmp
#mkdir jinst-signed
#cd jinst-signed
#tar zxvf ../jinstall-8.3R2.8-export-signed.tgz
Then untar the unsigned image:
#mkdir jinst
#cd jinst
#tar zxvf ../jinstall-8.3R2.8-export.tgz
Extract the pkgtools.tgz file and replace the checkpic binary inside with /usr/bin/true :
#mkdir pkgtools
#cd pkgtools
#tar zxvf ../pkgtools.tgz
#cd bin
#cp /usr/bin/true ./checkpic
#cd ..
Create tar for pkgtools then remove the directory:
#tar zcvf ../pkgtools.tgz *
#cd ..
#rm -rf pkgtools
Create tar for the new jinstall package with modified checkpic
#tar zcfv /var/tmp/jinstall-8.3R2.8-export-olive.tgz *
Then install the new jinstall with bsd pkg_add tool:
#pkg_add /var/tmp/jinstall-8.3R2.8-export-olive.tgz
It will ask to reboot to continue the installation.

#reboot
When it's rebooting, press Ctrl-Alt-2 and type: quit.
10. Login to Olive for the first time!
The default behavior from JunOS won't allow us to login to it from the standard output and we must use serial console instead. So start Qemu again using Jqemu.exe and this time put the option to redirect the output to serial port emulated by local TCP port 1001.
C:\qemu>jqemu.exe -L . -m 256 -hda Olive.img -serial telnet::1001,server -localtime -net nic,vlan=1,macaddr=00:aa:00:00:01:01,model=i82559er -net tap,vlan=1,ifname=Tap1
Qemu windows will pop up and it's waiting for TCP connection to port 1001.

Open another Windows DOS prompt and telnet 127.0.0.1 1001.

We can see the whole installation process until it reboots when it's done.


After JunOS installation is complete we can login to Olive for the first time with root account and no password.


From BSD prompt, type 'cli' to go to JunOS prompt, then assign the IP address 10.1.1.2/8 to fxp0
root@%cli
root>edit
[edit]
root#
Create password for the root account, then set the IP address
[edit]
root#set system root-authentication plain-text-password
New password:
Retype new password:
[edit]
root#set interface fxp0 unit 0 family inet address 10.1.1.2/8
[edit]
root#commit
commit complete
If everything is set up properly, we should have connectivity from Olive from fxp0 interface to Windows Tap 1 interface.

Later we can install Kqemu to improve the performance:
- download kqemu from here, and extract it to a folder.
- Go to that folder, then the kqemu folder within it, and right click on kqemu.inf, and select install.
- from windows prompt type 'net start kqemu'
C:\>net start kqemu
The KQEMU virtualisation module for QEMU service was started successfully.
Now we can start Olive using Jqemu with additional kernel-kqemu option:
C:\qemu>jqemu.exe -L . -m 256 -hda Olive.img -serial telnet::1001,server -kernel-kqemu -localtime -net nic,vlan=1,macaddr=00:aa:00:00:01:01,model=i82559er -net tap,vlan=1,ifname=Tap1
So far I have shown that Olive is alive.
But please remember Disclaimer 1: it doesn't exist.
Monday, January 14, 2008
Survival Mode
Everytime I do work that I don’t like but I have to do it anyway, I call myself as being in Survival Mode. Don’t get me wrong, this doesn’t mean I cannot deliver a good result. I still can perform, but it won’t satisfy me. And that just means I can do the work but it won’t make me happy.
Being in survival mode for quite long time is not a bad thing either. Sometimes it’s even a blessing in disguise. Because the frustration in this mode can force me to take decision that I would not even consider during normal circumstances. It might be a bad and jerky move, but on the other hand it can be a brave and bold decision that can change my life forever. Looking at the outcome that I may gain from the decision made under survival mode, I would say it’s a good way to jumpstart my life.
So let’s start measuring the level of my survival mode.
I put survival mode level measurement in this blog and when you see I’ve been in high level for quite some time you will be able to guess that big changes may come from me.
It’s 85% as of today. I guess a storm is coming.
Tuesday, January 08, 2008

Friday, January 04, 2008
Internetwork Expert's CCIE Blog
Excerpt from the blog:
"This site is dedicated to helping you in your pursuit of becoming a Cisco Certified Internetwork Expert in Routing & Switching, Voice, Security, Service Provider, and Storage. Through this blog you can submit questions to our expert instructors, Brian Dennis - Quad-CCIE #2210, and Brian McGahan – Triple CCIE #8593"
"This site is dedicated to helping you in your pursuit of becoming a Cisco Certified Internetwork Expert in Routing & Switching, Voice, Security, Service Provider, and Storage. Through this blog you can submit questions to our expert instructors, Brian Dennis - Quad-CCIE #2210, and Brian McGahan – Triple CCIE #8593"
Subscribe to:
Posts (Atom)